So Quirky G and I are driving down the road with the kids in the back, just chatting about stuff. On this particular day, we were discussing getting a new vehicle:
QG: I’d really like to get a new car.
S: What are you thinking about?
QG: A highlander but I don’t think we should spend the money right now.
S: You don’t you like this van?
QG: I hate it!
S: Well, it’s TARDIS blue.
QG: I’d totally drive it if it looked like a TARDIS!
S: Does it need to have a flashing lighting and make that sound?
QC: Why wouldn’t it?
S: I can do that.
And so this project was born: Make the van look like a TARDIS.
Step 1: The Police Station.
I wanted to check with an officer if the “POLICE BOX” marking and the flashing light would, you know, get us thrown in jail (well, get QG thrown in jail as she drives it. It’s not a good thing to get your wife thrown in jail). The officer looked at me like I had three heads, confused as to why I would want to do this to my van, be he was nice enough to looked up laws governing emergency vehicle marking for our area and printed me a copy. He told me to keep it in the glove box and avoid pulling anyone over and we’d probably be good. Step 1 complete.
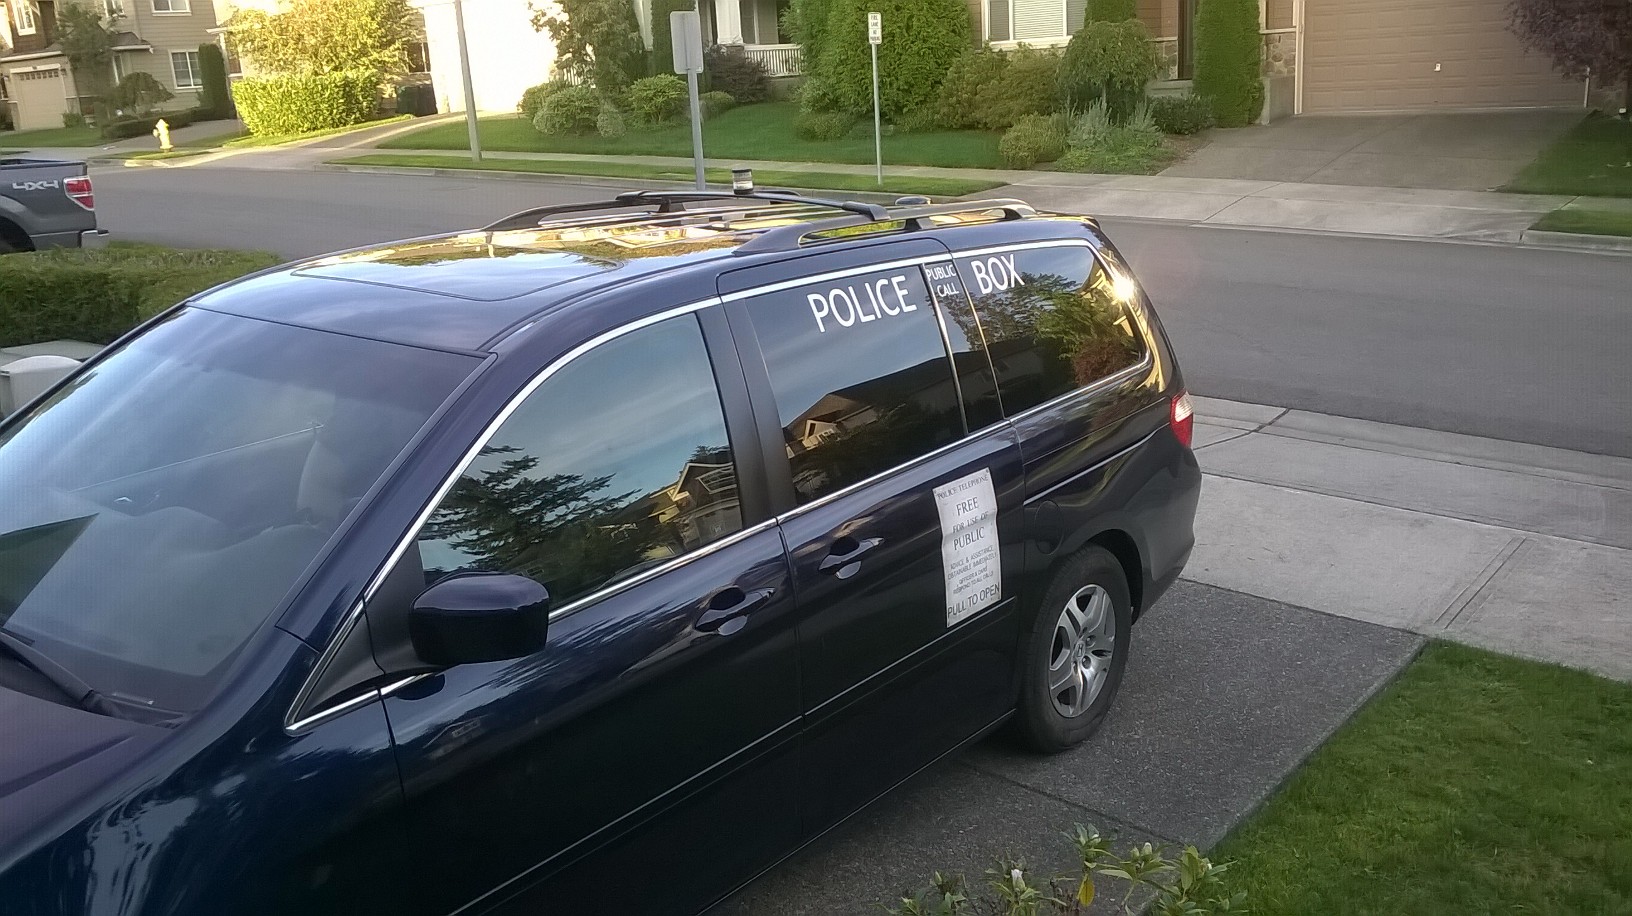
Step 2: Lettering and Graphics
I considered trying to do vinyl stripes on the windows but decided that since it was not really shaped like a TARDIS, adding details that implied a certain TARDIS shape was not really going to look good. Therefore, it would just be minimal: “POLICE BOX/PUBLIC CALL” letting and the door signs. Since Doctor #10 is QG’s favorite, I made sure to only include the larger sticker on the left side. After a bit of searching on the internet, I found a good source for the graphic here. I decided that vinyl letting would be perfect for the lettering across the top and that magnets would be good for the door stickers. I found a bunch of places on the internet to handle both, mainly for the purpose of making your car advertise your small business. I eventually became a bit worried about the magnet getting stolen and considered ordering multiples. After looking at the cost, I decided vinyl might be a better option since you can’t easily remove it and I’d only have to buy 2 copies so I looked for a vinyl letter place to handle that too. I landed on Do It Yourself Letting.com, which had a visual designer. I had to send in the graphic for a quote and the routed the order to a guy name (and I’m not kidding) Matt Smith. Our conversation went like this:
From: Matt Smith
To: Sparky
Sparky,
The total price for the two custom Tardis signs on premium vinyl is…
Best Regards,
Matt Smith
From: Sparky
To: Matt Smith
Perfect, thanks. I ordered online. I hope you get the irony that I’m ordering Tardis signs from someone named Matt Smith.
Thanks,
Sparky
From: Matt Smith
To: Sparky
Oh yes. I seem to get all of the Dr. Who orders. If I can only let all of the Whovians know that they can actually order this stuff directly from (a) Matt Smith, I would be set 😉
Best regards,
Matt Smith
Step 3: The Light.
I needed something waterproof that could handle a 70 mile-an-hour wind. I was initially thinking about an outdoor light retrofitted with a 12 volt bulb but I began to worry about what would happen if disconnected mid-highway and, say, busted through a windshield. I decided this was a bad thing. I decided plastic would be the way to go, much less chance of damage plus it would be more durable to the elements. I finally landed on this marine light; it’s made to be exposed to water; it’s plastic and it is highly visible. The van has the sides for a roof rack but no cross bars. I considered making one but decided if I wanted this to look good, I needed the factory roof rack cross bar. It was at this moment that I decided to not be cheap on the project and do it right. This is also the moment that the project cost began to exceed the estimated cost. Since the estimated cost had been communicated to QG, I knew this would be a good time to bring up the increased cost. I decided to hold off on that until after step 5 because I had an idea I knew would cost even more money.
Step 4: Speakers.
At first, I planned to mount the speakers on the roof rack bar with the light. While I was still in cheap mode, I bought these waterproof speakers. I figured if I mounted them so the speakers faced away from the wind, I’d be OK. Once they arrived, I could see they were more suitable for poolside than the top of the van. I also realized that even these small speakers would look huge on the roof so I decided I to hide the speakers in the engine compartment. I then bought these waterproof speakers. A few days later, I received the speakers and realized they were a bit big and did not easily fit in the engine compartment. I decided to remove the front bumper and stuff them in the hold intended for the fog lamps. Now, I really had no idea how to take the bumper off but luckily this great site, which sells accessories for Honda, also puts the installation instructions for their products on the web. Sure enough, they sell the fog lights so I downloaded the step-by-step instructions to removing the bumper. I was pretty amazed to find out it’s held on by 2 screws, 2 bolts and about 16 plastic clips. To make sure I could put the bumper back on, I bought more replacement clips here. Turns out, the bumper came off super easily, I mounted the speakers and the bumper went back on as easily as it came off. However, I’m not going to lie to you: running the wires from the engine compartment to the cabin was not fun. To power the speakers, I used an old 7-band EQ/amp I had lying around; sadly, it’s hard to find something like this today. If I didn’t have this, I would have bought an amplifier like this but in the end, I have to say that the EQ came in handy.
Step 5: Electronics.
I’m in my element here so this part turned out to be lots of fun. It was a pretty easy decision to decide on a microprocessor-based solution and I’m a big fan of the Atmel products. I sketched out the circuit and realized I’d need something with a pretty high pin count so I went with an ATmega328p. For the sound, I had this voice recorder kit lying around that I was no longer using based on an ISD25120 audio recorder/playback chip which is super easy to operate. I decided to use it instead of buying a new one. I wanted a 2-button RF remote control to trigger the thing and Ada Fruit came to the rescue with a 2-button remote and matching receiver. To control the light, I used a mosfet as described in this great tutorial. I slapped together a quick prototype of the sound and light circuits and the decided I really didn’t want to piece this together with multiple. So instead, I put the schematic in Eagle and created a board. This may sound daunting but Sparkfun has great tutorials for schematics and board layout in Eagle. Once I had designed the boards, I sent them to OSHPark for fabrication and the came back looking great! OSHPark takes an eagle file directly so it was super easy to upload the design. The C code makefile , schematic and board can be found on GitHub. I used the Pocket AVC Programmer from Sparkfun for loading the code into the micro.
Step 6: Assembly
the final assembly took a bit of time. I had to get the electronics mounted, tie into power, run power and speaker wires to the electronics, run the wire for the light bar down the door jamb and through the weather seal in a waterproof way and mount the light/roof rack assembly. The vinyl stickers went on the windows and doors easily. I also installed a new license plate frame on the back that says “It’s Bigger On The Inside”. Here’s the final look:

Step 7: The First Trip
The first trip in the van was to a birthday party. We didn’t get too much attention initially. We then stopped by the grocery store and QC ran inside. I sat in the car with the kids and saw lots of people staring a few people laughing (enjoying the car?). One lady even stopped to take a picture. But to me, it was all worth it when QC said “It looks great! It makes me giggle”.